1. Apache 2.4 설치 # yum -y install gcc* openssl* make apr apr-util apr-util-devel pcre-devel # wget http://mirror.navercorp.com/apache//httpd/httpd-2.4.41.tar.gz# tar xvfz httpd-2.4.41.tar.gz# cd httpd-2.4.41/# ./configure --prefix=/usr/local/apache --enable-so --enable-rewrite --enable-ssl --enable-modules=shared --enable-mods-shared=all --enable-apr --with-mpm=prefork --enable-apr-util# make &&..
PHP-FPM을 이용하여 한서버 안에 여러 PHP버전을 설치할 수 있으며, 동시에 사용 가능합니다.php.ini 파일은 각 버전마다 다르게 설정해주어야 합니다. ※ 설치환경 : CentOS 7.6※ Apache : 2.4 Mysql : 5.6 PHP : 5.6 7.0 7.2 1. PHP 설치시에는 Configure 옵션 설정하이라이트로 된 부분은 컴파일 옵션 시에 추가해야 하며, 빨간색 부분은 각 설치환경마다 다르게 설정해주어야 합니다. # ./configure \--prefix=/usr/local/php56 \--enable-fpm \--with-fpm-user=nobody \--with-fpm-group=nobody \--with-config-file-path=/usr/local/php56/etc \..
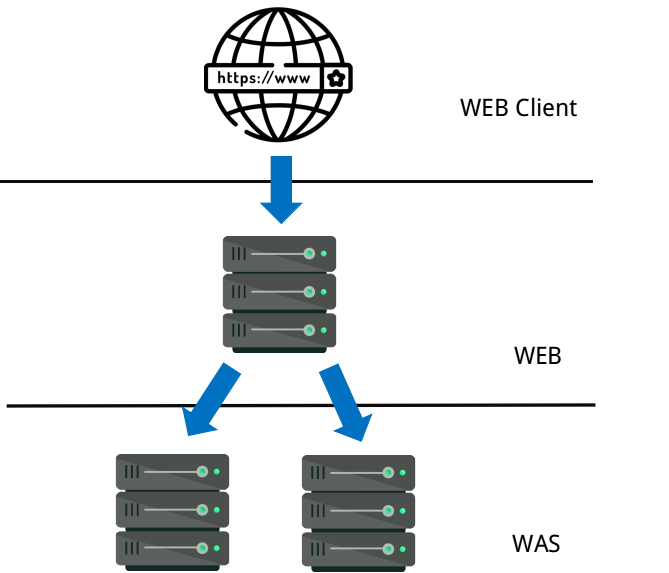
1. WEB 서버, WAS 서버란?WEB 서버는 HTML 문서와 같은 정적 컨텐츠를 처리하는 것(HTTP 프로토콜을 통해 읽을 수 있는 문서)Web 서버에 대표적인 예로는 apache, nginx, IIS 등이 있습니다. WAS 서버는 asp, php, jsp등 개발언어를 읽고 처리하여 동적 컨텐츠, 웹 응용 프로그램 서비스를 처리하는 것.WAS 서버의 대표적인 예로는 tomcat, jboss, jeus, web sphere 등이 있습니다.최근에는 WAS서버에는 WEB기능이 포함되어 있는 경우가 많습니다. 2. WEB서버와 WAS 서버를 분리하는 이유?- 기능을 분리하여 서버의 부하를 방지 WAS서버에서는 정적과 동적 처리가 가능한데, 정적처리를 하게 되면 부하가 많이 걸리게 됩니다. 그렇기 때문에, 접..
Cronolog란 아파치 로그를 날짜별로 나눠줄 수 있는 프로그램으로 여러 로그를 나눠 저장할 수 있는 프로그램입니다. 1) 설치방법# cd /usr/local/sbin# wget http://pkgs.fedoraproject.org/repo/pkgs/cronolog/cronolog-1.6.2.tar.gz/\a44564fd5a5b061a5691b9a837d04979/cronolog-1.6.2.tar.gz # tar xvfz cronolog-1.6.2.tar.gz# cd cronolog-1.6.2# ./configure# make && make install 2) 설정# vi /usr/local/apache/conf/httpd.confErrorLog "|/usr/local/sbin/cronolog /usr..
awstats란 웹로그 분석 툴로, 다양한 정보를 볼 수 있으며, 검색 엔진별로 접속로그, 어떤 키워드로 접속했는지 확인할 수 있는 툴입니다. awstats 홈페이지 : https://awstats.sourceforge.io/ ※CentOS 7 설치 1) 설치 진행# cd /usr/local/src# wget https://jaist.dl.sourceforge.net/project/awstats/AWStats/7.7/awstats-7.7.tar.gz# tar xvfz awstats-7.7.tar.gz# mv awstats-7.7 /usr/local/awstats# chmod -R /usr/local/awstats# chown -R root.root /usr/local/awstats awstats 설정 파..
※ 설치환경은 Ubuntu 18.04 버전입니다. 1. Apache 설치 apt-get 으로 설치 시에는 apache의 버전은 2.4버전입니다.# apt-cache show apache2 Package: apache2 Architecture: amd64 Version: 2.4.29-1ubuntu4.2 Priority: optional Section: web Origin: Ubuntu # apt-get install apache2# netstat -nltp | grep apache2 tcp6 0 0 :::80 :::* LISTEN 19813/apache2 해당 URL에 IP로 들어가게 되면 default 페이지가 뜨게 됩니다. 2. Mysql 설치 apt-get으로 설치 시에 mysql 버전은 5.7 버전..
# vi /etc/nginx/conf.d/default.conf server { listen 80; server_name localhost; #charset koi8-r; #access_log /var/log/nginx/host.access.log main; location / { root /usr/share/nginx/html; index index.html index.htm; proxy_set_header X-Real-IP $remote_addr; proxy_set_header X_Forwarded_For $proxy_add_x_forwarded_for; proxy_set_header Host $http_host; proxy_set_header X_NginX_Proxy true; proxy_pass ..
설치 환경 : node.js : 10.7 Apache 2.4 소스설치 # vi /usr/local/apache/conf/httpd.confLoadModule proxy_module modules/mod_proxy.so LoadModule proxy_http_module modules/mod_proxy_http.so # vi /usr/local/apache/conf/extra/httpd-vhost.confDocumentRoot “/usr/local/apache/htdocs/” ServerName IP주소 ErrorLog “logs/error_log” CustomLog “logs/access_log” common ProxyRequests off Order deny,allow Allow from all Pro..
node.js 홈페이지 : https://nodejs.org/dist/node.js는 확장성 있는 네트워크 애플리케이션(특히 서버 사이드) 개발에 사용되는 소프트웨어 플랫폼이다. 작성 언어로 자바스크립트를 활용하며 Non-blocking I/O와 단일 스레드 이벤트 루프를 통한 높은 처리 성능을 가지고 있다.버전별로 있으며, 아래 표를 참조하시면 됩니다. 안정화 버전인 10버전대로 설치를 진행해보겠습니다.# cd /usr/local/src # wget https://nodejs.org/dist/v10.7.0/node-v10.7.0.tar.gz # tar xvfz node-v10.7.0.tar.gz # cd node-v10.7.0 # ./configure # make && make install # nod..