1. Apache 설정 $ vi /etc/httpd/conf.modules.d/00-base.conf LoadModule status_module modules/mod_status.so $ cat /etc/httpd/conf.d/server-status.conf # 아래 내용 추가 SetHandler server-status Require ip xxx.xxx.xxx.xxx/32 Require host localhost #uncomment to only allow requests from localhost $ service httpd restart Redirecting to /bin/systemctl restart httpd.service $ netstat -nltp Active Internet conne..

1. Zabbix-agent 패키지 설치 $ wget https://repo.zabbix.com/zabbix/5.2/rhel/7/x86_64/zabbix-release-5.2-1.el7.noarch.rpm $ rpm -Uvh zabbix-release-5.2-1.el7.noarch.rpm warning: zabbix-release-5.2-1.el7.noarch.rpm: Header V4 RSA/SHA512 Signature, key ID a14fe591: NOKEY Preparing... ################################# [100%] Updating / installing... 1:zabbix-release-5.2-1.el7 #############################..

* Ubuntu 18.04 설치 진행 1. DB 설치 및 설정 $ apt-get install mariadb-server mariadb-client mariadb-common $ systemctl start mariadb $ systemctl enable mariadb $ netstat -nltp Active Internet connections (only servers) Proto Recv-Q Send-Q Local Address Foreign Address State PID/Program name tcp 0 0 127.0.0.53:53 0.0.0.0:* LISTEN 612/systemd-resolve tcp 0 0 0.0.0.0:22 0.0.0.0:* LISTEN 762/sshd tcp 0 0 127..
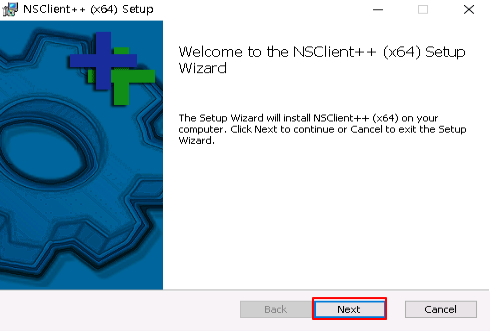
윈도우 서버도 리눅스와 동일하게 NSClient++ 프로그램을 이용해서 모니터링을 진행할 수 있습니다.아래 다운로드 경로를 통해서 다운로드 받습니다.다운로드 경로 : https://nsclient.org/download/ 아래 설치 과정을 설명하겠습니다. 다운로드를 받고나면 실행파일을 실행시켜 줍니다. Allowed Hosts의 경우 Nagios 서버쪽의 IP를 설정해주면 되며, 접속할 때의 password도 설정해줍니다.이 설정의 경우 설치 이후에도 설정파일을 통해서도 수정 가능합니다. 설치가 완료되면 아래 경로로 들어가면 nsclient.ini 설정파일이 있습니다. 필요한 내용을 추가, 제거 해서 사용하면 됩니다.경로 : C:\Program Files\NSClient++ 설정파일을 수정한뒤에는 서비스..
1. Nagios - Raid 체크 Nagios 플러그인을 이용해서 RAID를 체크할 수 있습니다. 해당 파일을 다운받아, /usr/local/nagios/libexec 밑에 추가해줍니다. 해당 파일을 열게 되면 레이드 명령어를 설정해주는 경로를 지정해주어야 합니다. my $megaclibin = '/opt/MegaRAID/MegaCli/MegaCli64'; 위에 레이드 경로를 적어주면 됩니다. 레이드의 경우 root 권한으로 실행되기 때문에, Nagios의 경우 Nagios 계정으로 생성되어 모니터링을 하게 되면 레이드를 체크할 때 root 권한을 주어야 합니다. sudoers를 통해서 권한을 주면 됩니다. $ vi /etc/sudoers.d/nagios nagios ALL=NOPASSWD:/opt/M..

Nagios 서버와 클라이언트를 구축했다면, 이제 텔래그램을 통해서 Nagios 알람을 받는 방법을 알아봅시다. 이전 Nagios 서버 구축과 클라이언트 구축 참고 글 아래 글 클릭 [LINUX/MONITORING] - Nagios 서버 구성 [LINUX/MONITORING] - Nagios 클라이언트 구성 ** 텔래그램 연동 ** Nagios 서버쪽에서 설치 진행 1. 텔래그램이 설치 $ wget -O /usr/local/bin/nagios_telegram.py https://raw.githubusercontent.com/pommi/telegram_nagios/master/telegram_nagios.py $ chmod 755 /usr/local/bin/nagios_telegram.py $ yum in..

전 파트에서는 Nagios 서버를 구축을 해 보았다면, 클라이언트 서버를 구축해서, 서버쪽에서 모니터링을 할 수 있게 설정해보는 작업을 진행해보고자 합니다. 전 파트 참고 글 아내 글 클릭!! [LINUX/MONITORING] - Nagios 서버 구성 ** 테스트 환경 : CentOS7 ** 클라이언트 환경 구축 ( 소스설치 ) 1. Nagios Plugin 설치 - Nagios 계정 생성 $ useradd nagios $ usermod -a -G nagios nobody - 필수 패키지 설치 $ yum -y install wget vim $ yum install mod_ssl openssl-devel gcc make openssl perl xinetd automake - Nagios Plugin 소스..

이번 주제로는 Nagios 서버를 구축해보고, 모니터링을 하는 방식, 마지막으로 텔레그램을 연동하는 방법까지 총 3가지 파트로 나누어서 얘기해보고자 합니다. 1. Nagios란 무엇인가? Nagios는 오픈소스 모니터링 프로그램으로 전체 IT인프라를 모니터링하여 웹, 응용프로그램 등 해당 프로세스가 정상적으로 작동하는지 확인합니다. 또한 시스템 뿐만 아니라, 네트워크 장치에 대한 모니터링도 가능하며, 알림 기능 또한 제공하고 있습니다. Nagios 종류로는 오픈소스 버전인 Nagios Core와 상용버전인 Nagios XI 두가지가 있습니다. Nagios에서 실제로 모니터링을 담당하는 시스템을 Nagios 서버라고 하며, 모니터링이 되는 대상 시스템을 Nagios 에이전트 또는 타켓이라고 부릅니다. Na..
zabbix란 서버나 네트워크 등을 포함한 클라이언트의 서비스를 실시간으로 체크하여 모니터링하는 관리 소프트웨어입니다. zabbix 다운로드 https://www.zabbix.com/download Download and install Zabbix www.zabbix.com 1. zabbix 설치 $ groupadd zabbix $ useradd -g zabbix zabbix $ mkdir /usr/local/zabbix $ mkdir /usr/local/zabbix/server $ cd /usr/local/src $ wget https://jaist.dl.sourceforge.net/project/zabbix/ZABBIX Latest Stable/4.2.0/zabbix-4.2.0.tar.gz $ tar..
cockpit은 GUI 환경으로 구성된 모니터링 및 관리 툴입니다. 설치환경은 CENTOS 7 에서 진행하였습니다. cockpit 설치# yum install cockpit # vi /etc/sysconfig/iptables -A RH-Firewall-1-INPUT -p tcp -m state –state NEW -m tcp –dport 9090 -j ACCEPT # service iptables restart # systemctl start cockpit.socket # systemctl enable cockpit.socket URL에 도메인이나 IP:9090 로 접속합니다. 최근 5 분동안의 CPU, 메모리, 디스크의 입·출력, 네트워크 트래픽을 확인할 수 있으며, 시스템의 핵심 요소를 구성하고 있는..